Quilt Photography Workshop Link Up
I was super excited to see Beth's new photography link up. I feel pretty comfortable with my camera (which came from A LOT of practice), but I wanted to participate because I feel very uncreative when it comes to taking photos of finished quilts. And I am certainly no pro, I am always on the lookout for tips!
Some info about how I take photos:
- My camera is a Nikon d7000. I adore this camera.
- I primarily use a Nikon 35mm 1.8 lens which is a prime lens. If you aren't familiar with what this is, it has a fixed focal length and can't zoom. That makes it smaller and lighter and, while I do have to take a few steps further back to photograph entire quilts since I can't zoom out, it means that I can shoot at a low aperture which helps gives photos that blurred background look (bokeh). Plus the primarily reason I got interested in photography was for taking pictures of my kids and prime lenses are great for portraits. I do have a zoom lens but I can't even remember the last time I used it.
- I take 100% of my photos in manual mode. It takes some practice but it is completely worth it.
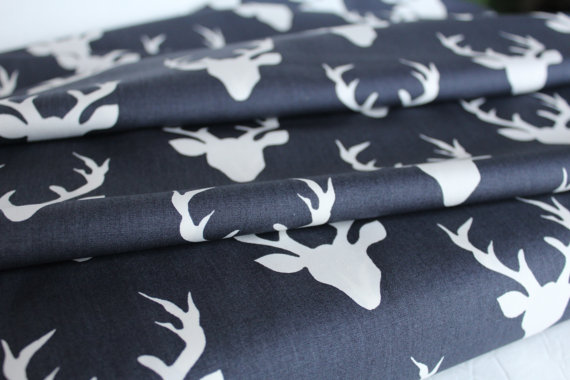
I ordered this stack of fabric from Stash Modern Fabric a few weeks ago as a preorder and was super happy and surprised when it showed up this week since I had forgotten about it :)
 |
| ISO2000 1/250 f/2.5 |
Most lenses will significantly start to lose sharpness at a certain aperture and that definitely varies from lens to lens. For my lens that is f/2.5. The photo above is taken at f/2.5 and the one below is taken at f/1.8. The one below has more bokeh, but it's not a ton more and I generally don't think it is worth sacrificing sharpness. This one actually turned out okay, but I generally try to stay at or above f/2.5 unless I am in a super low light situation of I am going for the super-blurry-background effect.
 |
| ISO1000 1/250 f/1.8 |
I do most of my post processing in Lightroom. There are great photo programs that are free (Picasa, iPhoto, etc.) but if you are a little more serious about taking photos Lightroom is a great option. Unless you are going pro, Photoshop is overkill. I load all photos into the program and make a couple of quick adjustments. The adjustments that I usually make are:
- White balance. Since my apartment is dark and shady, most of my photos are too cool (blue). I just warm them up a bit by increasing the yellow in the photo.
- I generally increase the brightness and contrast just a tad. Just to give them a little pop.
- I always sharpen photos so they look nice and crisp.
You can see the difference that post processing makes in this photo. Some photos need it more than others, this one didn't need it too much but I think it's worth the extra effort.
I hope that some of this info is helpful and I would be happy to go into more detail if there is any interest. I am looking forward to reading all of the posts in the linkup!


Thanks for sharing. Pretty pics and fabric. I recently got a fixed lense, well I guess for Christmas so not that recent, eep! It's a 50mm, and I wish I'd gotten a smaller mm. But you live, you learn. I do love it, so no complaints. It's just hard to fit a whole quilt in without stepping way back. So I have to switch to my zoom.
ReplyDeleteI need to figure out at which f my sharpness starts to go. I've noticed but haven't delved into that business yet.
Man, so much to learn!
Glad you posted! I will try some of your suggestions - thanks much!
ReplyDeleteWow, I'm impressed that you take all your photos in manual mode. I have a decent camera but I'm totally a auto mode girl myself. I always think your pictures are really good, so thanks for the tips!
ReplyDeleteThe one big thing I am learning from visiting these posts, including yours, is that I need to experiment with editing my photos in a programs such as Picasa, (which I have, so it's free!) Really enjoyed seeing the side by side shot showing the difference it can make. Thanks for sharing, Erica!
ReplyDeleteWow this is an awesome post! I just signed up for a photography course on Craftsy to help me improve on my photos! I wish I could figure out how to shoot my camera in manual mode, but I don't think I have that option!
ReplyDeleteGood post, Erica! I'm always playing around with different combos of settings, and it certainly is a learning process!
ReplyDeleteThanks a lot for the tips!!!
ReplyDeleteI use a fixed lens 99% of the time too - it was the only lens I had for awhile so I got used to having to move around instead of zooming (I just recently bought a zoom lens but have only used it a couple of times.) Thanks for the great tips and for showing the differences between the pics.
ReplyDeleteI just have a point and shoot though I have kind of been wanting a DSl for a while. I didn't really want to part with the cash (that I could use for fabric). But just reading all the you wrote even though I don't understand it makes me really really want one. I think I may use some money that I get in October for my birthday to buy one.
ReplyDeletethe light in my house seems to be cool, also. I've been playing with white balance lately to try and help this. you gave some great points to consider with your post!
ReplyDeleteThanks so much, Ericka, for all of your tips. I just got a hand-me-down DSLR, which I am still using in auto mode. I really appreciate your info, as I would love to be able to switch to manual.
ReplyDeleteLove your photos! They're very pretty.
ReplyDeleteSuper duper helpful, bookmarking this! Thanks!!!
ReplyDeleteReading these posts from you-all who are MUCH more camera-knowledgeable than me is a huge help. Thank you! I appreciated especially reading why you use a fixed lens.
ReplyDeleteOh wow, I can really see the difference in the adjusted photo. I appreciate all the tips you just gave. I have the same type of lens for my Canon and have used it a few times, but I really need to get on the ball and learn what works instead of stabbing in the dark each time. Thanks!
ReplyDeleteThanks for all of the tips and information. I hope to work up to using manual whenever I chose to, without worrying I will mess up a shot!
ReplyDeleteThank you so much for this post. I seem to learn little piece by piece, and your comments about losing sharpness beyond 2.5 explain a lot for me. I've been going down to 1.8 regularly and wondering why I struggle so with sharpness. If you have any books to recommend, I'd be so excited to hear your suggestions. Thanks again!
ReplyDeleteThe information you have posted is very useful. The sites you have referred was good. Thanks for sharing...
ReplyDeleteSEO Company
ReplyDeleteThanks for sharing this Post, Keep Updating such topics.
techvilli